Table of contents
- Introduction
- The recoding function and its arguments
- Recoding variables using the command line
- Recoding variables using the GUI
Introduction
When performing analyses, very often some of the variables need to be recoded. Such recodings would include reversing the values, collapsing several categories into one, or even setting some of the values to missing. The analysis which would require this most often is probably the binary logistic regression because this type of analysis requires a dichotomous (i.e. binary) dependent variable and not many of the variables in the databases are as such. This is why this functionality becomes very useful. The recoding can be done for an individual variable or multiple variables with the same structure at once. The recoding functionality can also take care for the user-defined missing values in a rather flexible way. The recoding functionality has many warnings along the way to prevent the analyst from mistakes. We would recommend to always recode the variables into new ones instead of overwriting the existing ones. This way the original variables will always be available if some other analyses need to use them.
Prior to recoding the variables of interest, it worth checking their properties by viewing their dictionaries. This can be very helpful to get an idea of what the variables are and prevent from mistakes.
The recoding function and its arguments
The lsa.recode.vars function has the following arguments:
data.file– Full path to the .RData file containinglsa.dataobject. Either this ordata.objectshall be specified, but not both.data.object– The object in the memory containinglsa.dataobject. Either this ordata.fileshall be specified, but not both.src.variables– Names of the source variables with the same class whose values shall be recoded.new.variables– Optional, vector of variable names to be created with the recoded values with the same length assrc.variables. If missing, thesrc.variableswill be overwritten.old.new– String with the recoding instructions matching the length of the factor levels (or unique values in case of numeric or character variables) in the variables.new.labels– The new labels if thesrc.variablesvariables are of class factor or labels to be assigned to the recoded values (i.e. turning variables of class numeric or character into factors) with the same length as the new desired values.missings.attr– Optional, list of character vectors to assign user-defined missing values for each recoded variable.variable.labels– Optional, string vector with the new variable labels to be assigned.out.file– Full path to the .RData file to be written. If missing, the object will be written to memory.
Notes:
- The data must be of class
lsa.data, these are converted from SPSS (or TXT in case of PISA prior to its 2015 cycle) using thelsa.convert.datafunction. - The
data.fileanddata.objectare mutually exclusive, either one of them shall be provided, but not both. Thedata.fileargument takes a file path points to an .RData file containing large-scale assessment data. Thedata.objectpoints to anlsa.dataobject loaded in the memory. A file can be loaded in the memory using the Rload("<path-to-file>")function where the<path-to-file>is the full file path to .RData file. - If no full path to the
out.fileis provided, the data will remain in the memory as large-scale assessment object. This can be convenient if you need to do some further modifications to the object, like deleting columns, for example. - The variable names passed to
src.variablesmust be with the same class and structure, i.e. same number of levels and same labels in case of factor variables, or the same unique values in case of numeric or character variables. If the classes differ, the function will stop with an error. If the unique values and/or labels differ, the function would execute the recodings, but will drop a warning. - The
new.variablesis optional. If provided, the recoded values will be saved under the provided new variable names and thesrc.variableswill remain unchanged. If missing, the variables passed insrc.variableswill be overwritten. Note that the number of names passed tosrc.variablesandnew.variablesmust be the same. - The
old.new(old values to new values) is the recoding scheme to be evaluated and executed provided as a characters string in the form of “1=1;2=1;3=2;4=3”. In this example it means “recode 1 into 1, 2 into one, 3 into 2, and 4 into 3”. Note that all available values have to be included in the recoding statement, even if they are not to be changed. In this example, if we omit recoding 1 into 1, 1 will be set to NA during the recoding. This recoding definition works with factor and numeric variables. For character variables the individual values have to be defined in full, e.g."'No time'='30 minutes or less';'30 minutes or less'='30 minutes or less';'More than 30 minutes'='More than 30 minutes';'Omitted or invalid'='Omitted or invalid'"because these cannot be reliably referred to by position (as for factors) or actual number (as for numeric). - The
new.labelsassigns new labels to factor variables. Their length must be the same as for the newly recoded values. If the variables passed tosrc.variabesare character or numeric, andnew.labelsare provided, the recoded variables will be converted to factors. If, on the other hand, thesrc.variablesare factors and nonew.labelsare provided, the variables will be converted to numeric. - Note that the
lsa.convert.datahas two options: keep the user-defined missing values (missing.to.NA = FALSE) and set the user-defined missing values to NA (missing.to.NA = TRUE). The former option will provide an attribute with user-defined missing values attached to each variable they have been defined for, the latter will not (i.e. will assign all user-defined missing values to NA). In case variables from data converted with the former option are recoded, user-defined missing values have to be supplied tomissings.attr, otherwise (if all available values are recoded) the user-defined missing values will appear as valid codes. Not recoding the user-defined missing codes available in the data will automatically set them to NA. In either case, the function will drop a warning. On the other hand, if the data was exported with missing.to.NA = TRUE, there will be no attributes with user-defined missing codes and omittingmissings.attrwill issue no warning. User-defined missing codes can, however, be added in this case too, if necessary. Themissings.attrhas to be provided as a list where each component is a vector with the values for the missing codes. See the examples. - The
variable.labelsargument provides the variable labels to be assigned to the recoded variables. If omitted andnew.variablesare provided the newly created variables will have no variable labels. If provided, andnew.variablesare not provided, they will be ignored.
Recoding variables using the command line
In the examples that follow we will merge a new data file (see how to merge files here) with student and school principal data from PIRLS 2016 (Australia and Slovenia), taking all variables from both file types:
lsa.merge.data(inp.folder = "C:/temp",
               file.types = list(acg = NULL, asg = NULL),
               ISO = c("aus", "svn"),
               out.file = "C:/temp/merged/PIRLS_2016_ACG_ASG_merged.RData")
As a start, let’s reverse the student responses on how often they feel tired at school. So, let’s use the ASBG07A. It would be a good idea to see the variable dictionary for this variable. To do so, execute the following syntax in RStudio:
lsa.vars.dict(data.file = "C:/temp/merged/PIRLS_2016_ACG_ASG_AUS_SVN.RData",
              var.names = "ASBG07A")
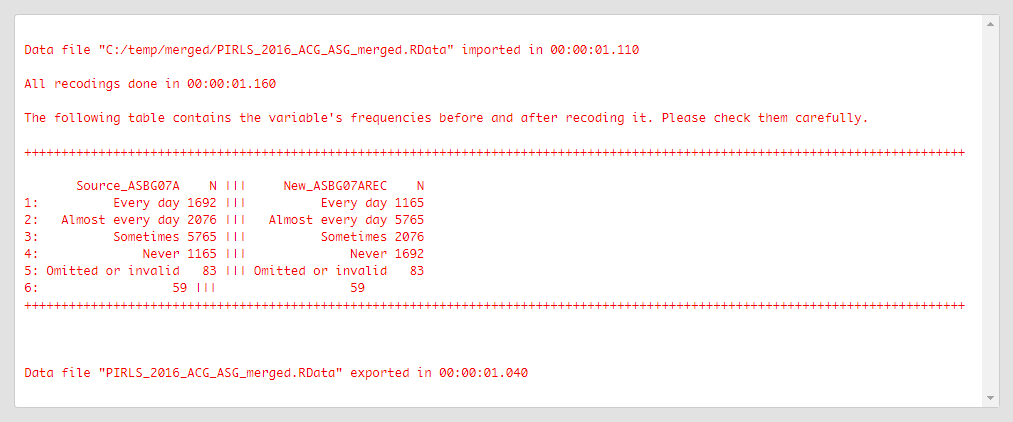
The call to this syntax will return the following output in the console:
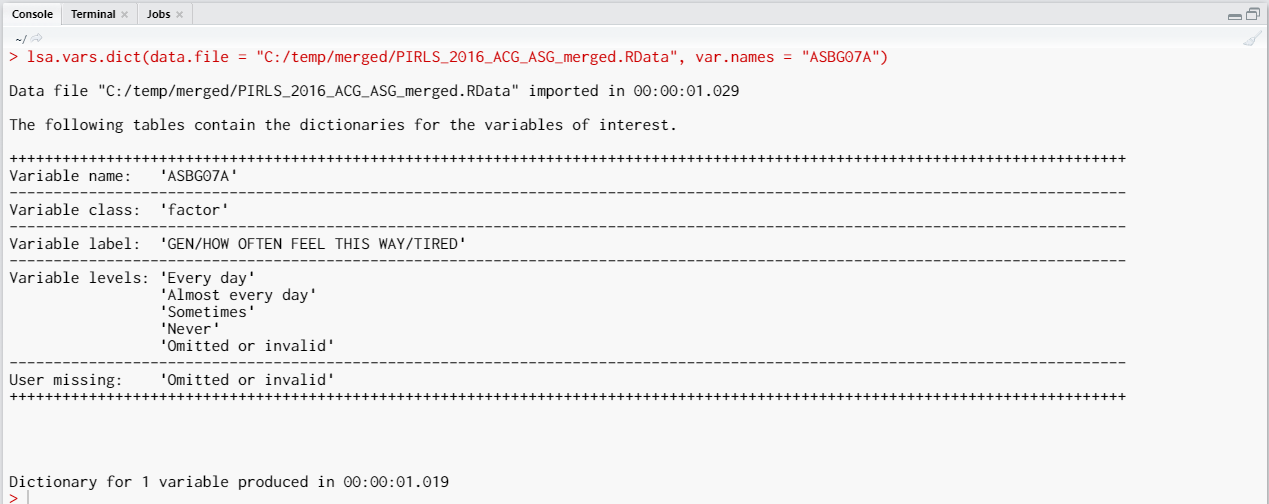
The variable is a factor (i.e. categorical variable) with “Every day”, “Almost every day”, “Sometimes”, and “Never” as valid values. There is one more value as well, “Omitted or invalid”. The output from above shows are that it is a user-defined missing value. Let’s reverse the variable, so that the response categories become “Never”, “Sometimes”, “Almost every day”, and “Every day”. We will keep the user-defined missing value (“Omitted or invalid”) as it is, it will also remain as the last category:
lsa.recode.vars(data.file = "C:/temp/merged/PIRLS_2016_ACG_ASG_merged.RData",
                src.variables = "ASBG07A", new.variables = "ASBG07AREC",
                old.new = "1=4;2=3;3=2;4=1;5=5",
                missings.attr = list("Omitted or invalid"),
                new.labels = c("Never", "Sometimes", "Almost every day",
                "Every day", "Omitted or invalid"),
                out.file = "C:/temp/merged/PIRLS_2016_ACG_ASG_merged.RData")
After we execute the syntax from above, the recodings will be done, saved in a new variable (ASBG07AREC), the missing values will be assigned to an attribute of the new variable, and the file will be saved, overwriting the original file. The following output will be returned in the console:
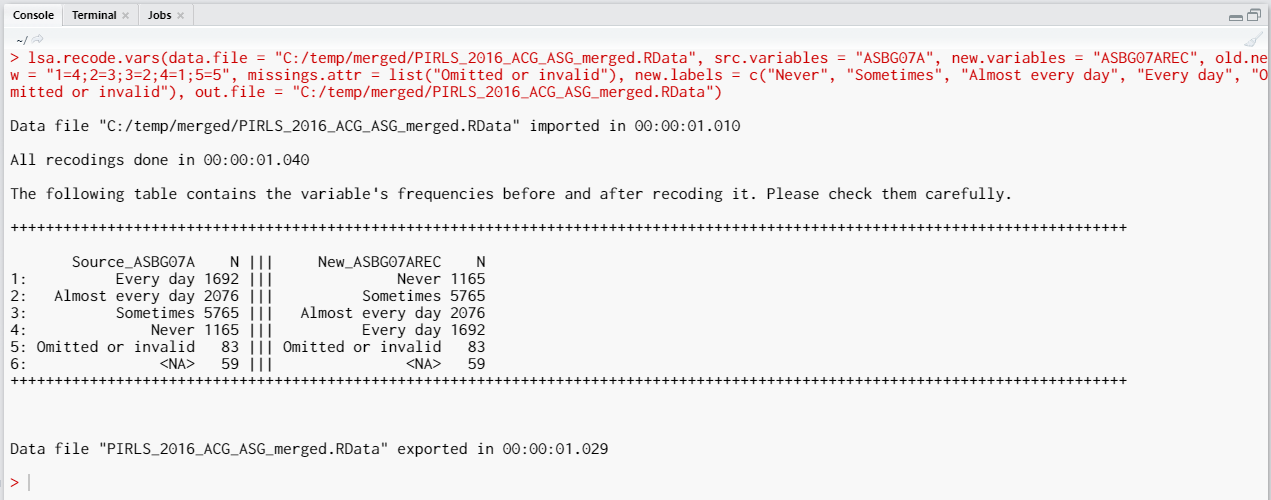
The table printed in the console gives you information what was done, you should inspect it carefully. On the left side (source) are the original categories and their frequencies of the variable we recoded. On the right side (new) are the categories of the new, recoded, variable and their frequencies. Check carefully if the labels and the frequencies on both sides correspond, this is important for the results of your analyses involving this variable.
Few things to note:
- The syntax from above reads a data file, note the full file path passed to the .RData file. Instead, you could use an
lsa.dataobject loaded in the memory through theload("<path-to-your-file>")command. - The original variable (
src.variables = "ASBG07A") is recoded into new variable (new.variables = "ASBG07AREC"). We could have omitted the latter argument, but this would overwrite the original variable. This is not recommended, as we might need this variable later. - Note how the old and new values are passed to the
old.newargument. Each pair of old and new values is separated by equal sign, old values on the left, new values on the right. The old and new values are not the actual value labels, but their position in the structure of the factor levels. Each pair is separated from the others with semicolons, telling the function where it starts and ends. - If you omit any of the values in the old values of
old.new, it will be converted to NA. Be careful, unless this is intended. - The number of
new.labelsfor the factor values shall be equal to the pairs inold.new. - If you don’t add “Omitted or invalid” in the
missing.attrargument, it will become a valid value in the recoded variable. If you omit adding it for recoding inold.newargument, it will be recoded to NA. This can be useful if you don’t need having user-defined missing values. - You can add any of the valid values in the
missing.attrto become user-defined value. Or just omit it as a recoding instruction fromold.new, it will be recoded to NA. Looking at the example, the category never may be regarded as such in some circumstances. - If we omit the
out.fileargument, no data file will be written on the hard drive. Instead, the data will remain aslsa.dataobject in the memory. This can be useful if you prefer to have the data as object to work directly with. However, it is better to save your work, you can always load a file in the memory with theload("<path-to-your-file>")command.
Let’s now collapse the categories of multiple variables at once. Please note that when recoding multiple variables at once, they all have to be of the same class (factor, numeric, or character), same levels/unique values, and user-defined missings (if any). If any of these conditions is not met, the function will stop with an error message. In the example that follows, we will recode four variables ASBG11A, ASBG11B, ASBG11C, and ASBG11D. The variables contain the data from the student responses on how long they do certain activities per day – playing computer games, watching videos, chatting or use internet, respectively. The variables are factors and their categories are as follows:
- No time;
- Less than 30 minutes;
- 30 minutes up to 1 hour;
- From 1 hour up to 2 hours;
- 2 hours or more;
- Omitted or invalid.
The last category is a user-defined missing value. Let’s collapse the valid response categories for this variable to two:
- Up to one hour (i.e. collapse categories 1, 2 and 3); and
- More than one hour (i.e. collapse categories 4 and 5).
The syntax for this is as follows:
lsa.recode.vars(data.file = "C:/temp/merged/PIRLS_2016_ACG_ASG_merged.RData",
                src.variables = c("ASBG11A", "ASBG11B", "ASBG11C", "ASBG11D"),
                new.variables = c("ASBG11AREC", "ASBG11BREC", "ASBG11CREC", "ASBG11DREC"),
                old.new = "1=1;2=1;3=1;4=2;5=2;6=3",
                new.labels = c("Up to one hour", "More than one hour", "Omitted or invalid"),
                variable.labels = c("Recoded GEN/USE COMPUTER TABLET ACTIVITIES/GAMES",
                "Recoded GEN/USE COMPUTER TABLET ACTIVITIES/VIDEOS",
                "Recoded GEN/USE COMPUTER TABLET ACTIVITIES/CHATTING",
                "Recoded GEN/USE COMPUTER TABLET ACTIVITIES/INTERNET"),
                missings.attr = list("Omitted or invalid"),
                out.file = "C:/temp/merged/PIRLS_2016_ACG_ASG_merged.RData")
Few things to note:
- The number of new variables has to be equal to the number of old (i.e. source) variables.
- The new values passed to the
old.newargument have to start from 1 and be sequential. R factor levels cannot take arbitrary numbers. - The number of labels passed to
new.labelsmust be the same as the number of new levels. - This time we assign new variable labels through the
variable.labelsargument. The number of variable labels must be the same as the number of old and new variables.
As with the previous example, a diagnostic output will be printed in the RStudio console. Inspect it carefully, the success of the recodings will be important for your analysis later.
Recoding variables using the GUI
To start the RALSA user interface, execute the following command in RStudio:
ralsaGUI()
For the examples that follow, merge a new file with PIRLS 2016 data for Australia and Slovenia (Slovenia, not Slovakia) taking all student and school principal variables. See how to merge data files here. You can name the merged file PIRLS_2016_ACG_ASG_merged.RData.
When done merging the data, select Data preparation > Recode variables from the menu on the left. When navigated to the Recode variables in the GUI, click on the Choose data file button. Navigate to the folder containing the merged PIRLS_2016_ACG_ASG_merged.RData file, select it and click the Select button.

Once the file is loaded, you will see the two panels with the available variables and selected variables (the latter is currently empty):
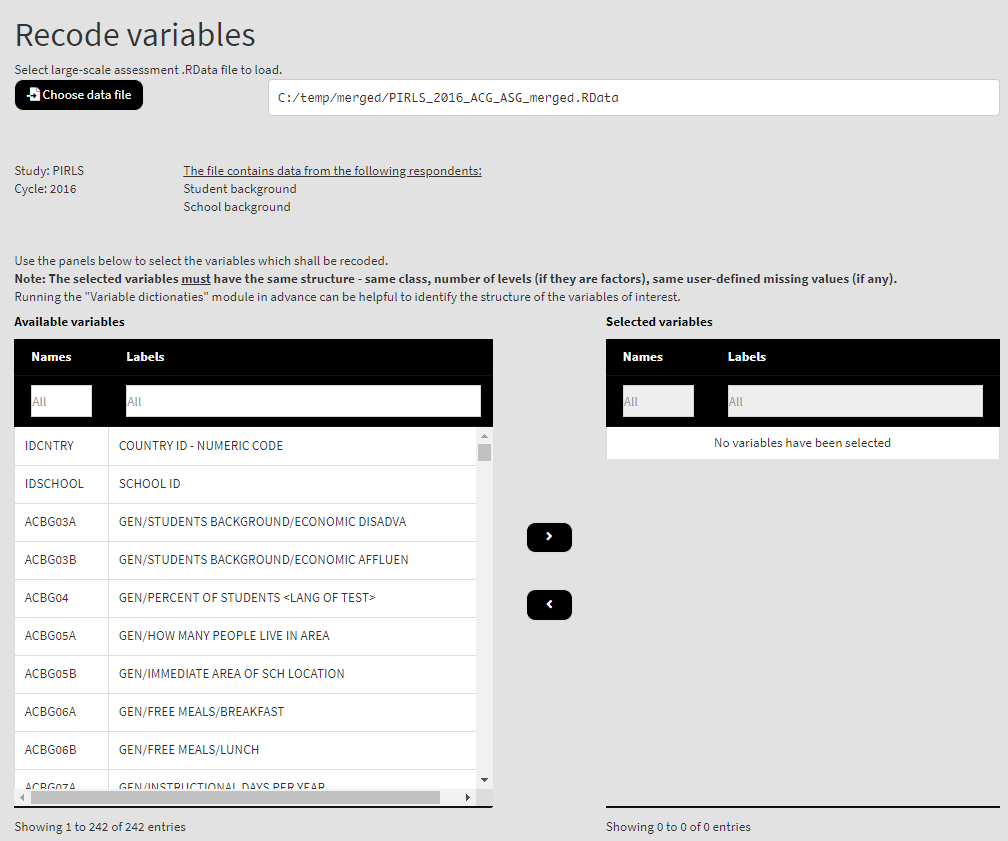
Use the mouse to select individual variables and the single arrow buttons to move them from the list of available variables to the list of selected variables and vice versa. You can use the filter boxes on the top of the panels to find the needed variables quickly. Note that the selected variables must have the same structure – class, number of levels/unique values, labels (if any) and user-defined missing values (if any). If any of these conditions is not met, the GUI will not let you continue any further and warnings will be displayed. As a start, let’s reverse the student responses on how often they feel tired at school. So, let’s use the ASBG07 (it worth viewing the dictionary for this variable first, you can see how to do this here). Find the variable in the list of available variables on the right (you can use the filter at the top) and move it to the list of the selected variables. It would be a good idea to see the variable dictionary for this variable. Once there are any variables in the Selected variables panel, the following elements will appear:
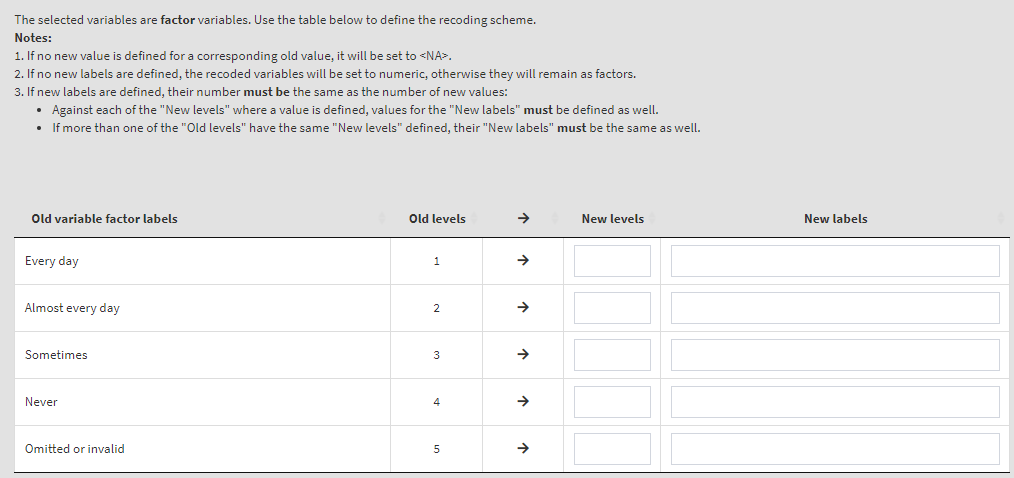
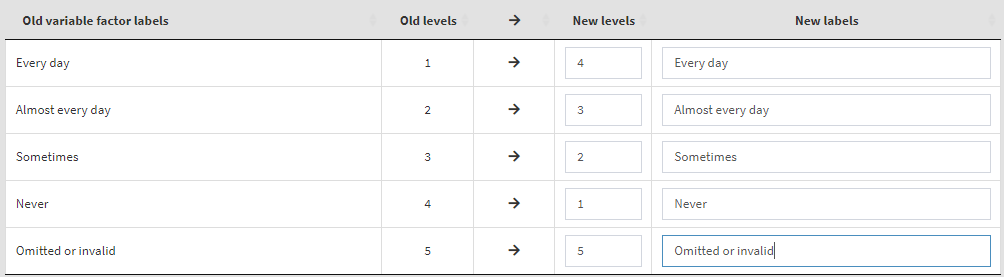
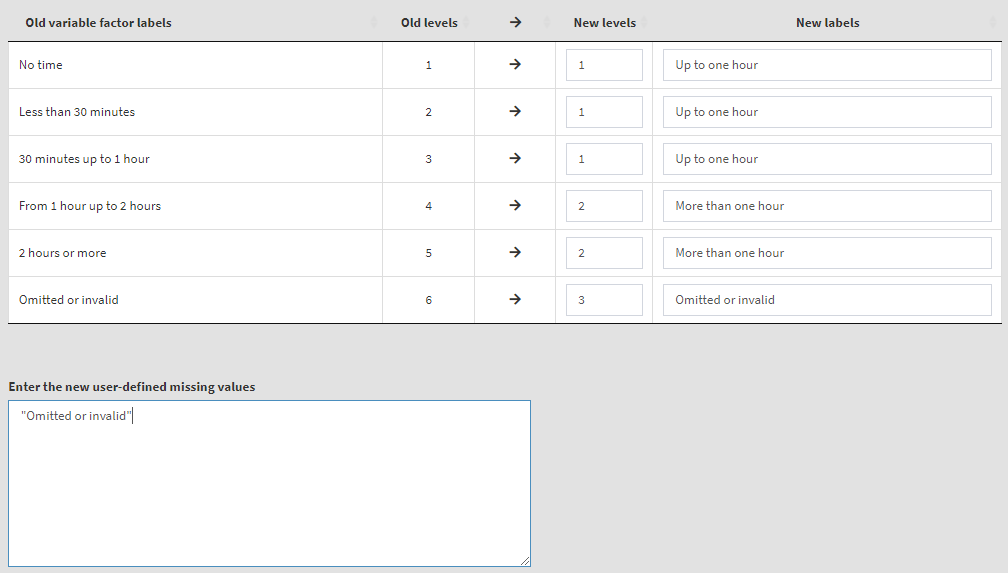
Read the notes at the top, these are important considerations for the further steps you need to take. To define the old and new values, type them in the New levels column in the table above. Note that while defining the recoding instruction the GUI will show you different warning messages in red above the table. Make sure you read them, they are important. Not each of them may represent an error, some just warn you that a specific action will be taken. If you like that the variable stays a factor and has labels, enter the new labels in the corresponding column. If you omit them, the recoded variable will be turned into numeric. In addition, the user-defined missing category in the table (“Omitted or invalid”) will be defined again as the last category (5). If omitted, it will be recoded to NA. The settings will look like this:
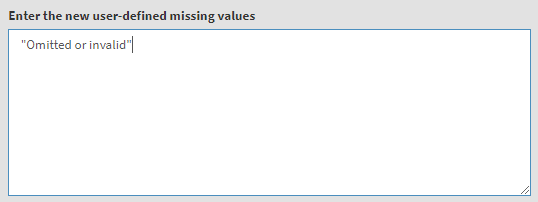
Underneath you will see a text field for the definition of user-defined missing values. We will add “Omitted or invalid” there, so that it will stay a user-defined missing value. You can also add other values from the table above (i.e. they have to exist as new value) and they will be set to user-defined missings, if needed. The textbox will look like this:
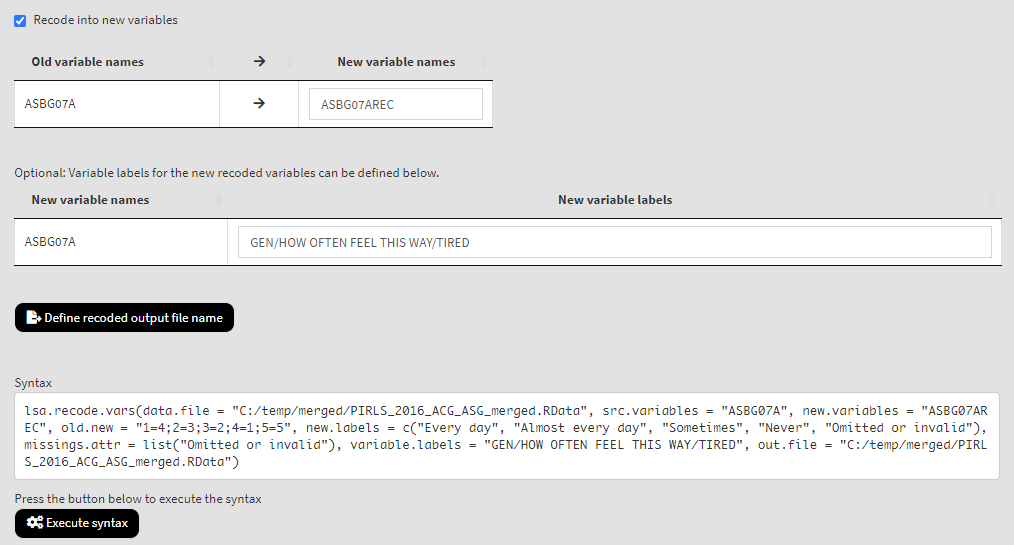
Underneath you will see the checkbox Recode into new variables. It will be selected by default, meaning that the recoded values will be saved into a new variable. Otherwise, the original variable will be overwritten. We would strongly advise you to leave it checked and save the recodings into a new variable. In the tables below add the new variable names and their labels. Once the new variable name is entered, the Define recoded output file name will appear. Click on it, navigate to the folder where the source file is located, click on it and confirm it will be overwritten. When you do so, the syntax to be executed and the Execute syntax button will appear. The final settings for this section will look like this:
Click on the Execute syntax button. The GUI console will appear at the bottom and will log all completed operations:
Revise the old (source) and new values from above carefully to make sure that all recodings were done as intended.
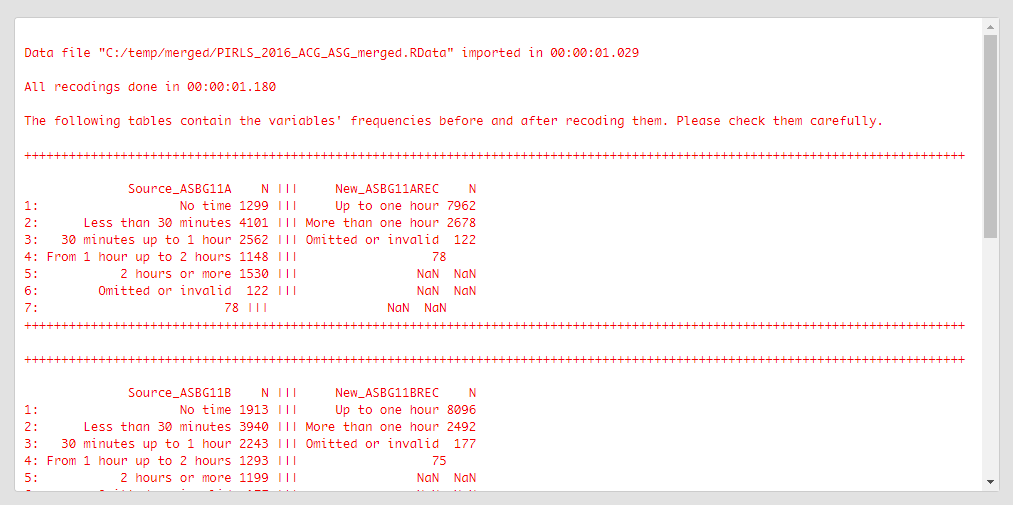
Let’s now collapse the categories of multiple variables at once. Please note that when recoding multiple variables at once, they all have to be of the same class (factor, numeric, or character), same levels/unique values, and user-defined missings (if any). If any of these conditions is not met, the function will stop with an error message. In the example that follows, we will recode four variables ASBG11A, ASBG11B, ASBG11C, and ASBG11D. The variables contain the data from the student responses on how long they do certain activities per day – playing computer games, watching videos, chatting or use internet, respectively. All variables have the same structure – all are factors and their categories are as follows:
- No time;
- Less than 30 minutes;
- 30 minutes up to 1 hour;
- From 1 hour up to 2 hours;
- 2 hours or more;
- Omitted or invalid.
The last category is a user-defined missing value. Let’s collapse the valid response categories for this variable to two:
- Up to one hour (i.e. collapse categories 1, 2 and 3); and
- More than one hour (i.e. collapse categories 4 and 5).
To start, remove ASBG07A from the list of Selected variables. From the list of Available variables select variables ASBG11A, ASBG11B, ASBG11C, and ASBG11D (you can use the filter box under Names) and move them to the list of Selected variables. The table which will appear below will be used to make the recoding settings for all four variables at once. We will keep “Omitted or invalid” as a user-defined missing value. Given the recoding description above, the settings will look like this:
Now we have more than one variable to recode and for each of the old (source) variables we have to define the names for the new variables they will be recoded into, as well as their labels:

If you need to, change the output file name clicking on the Define recoded output file name button. Click on the Execute syntax button. The execution will start, the console will be displayed at the bottom of the GUI. You will see a message letting you know when all operations are done. This time the console has much more output to show. Scroll down and check if all recodings were done as intended.